After creating a ticket, you can integrate EventHub with the payment platform Stripe to make it a paid ticket. Those who register for the event through a paid ticket will be first asked to purchase a ticket through credit card payment. Once they have done so, they will then be able to access the event page.
Contents
1. Create a ticket/form
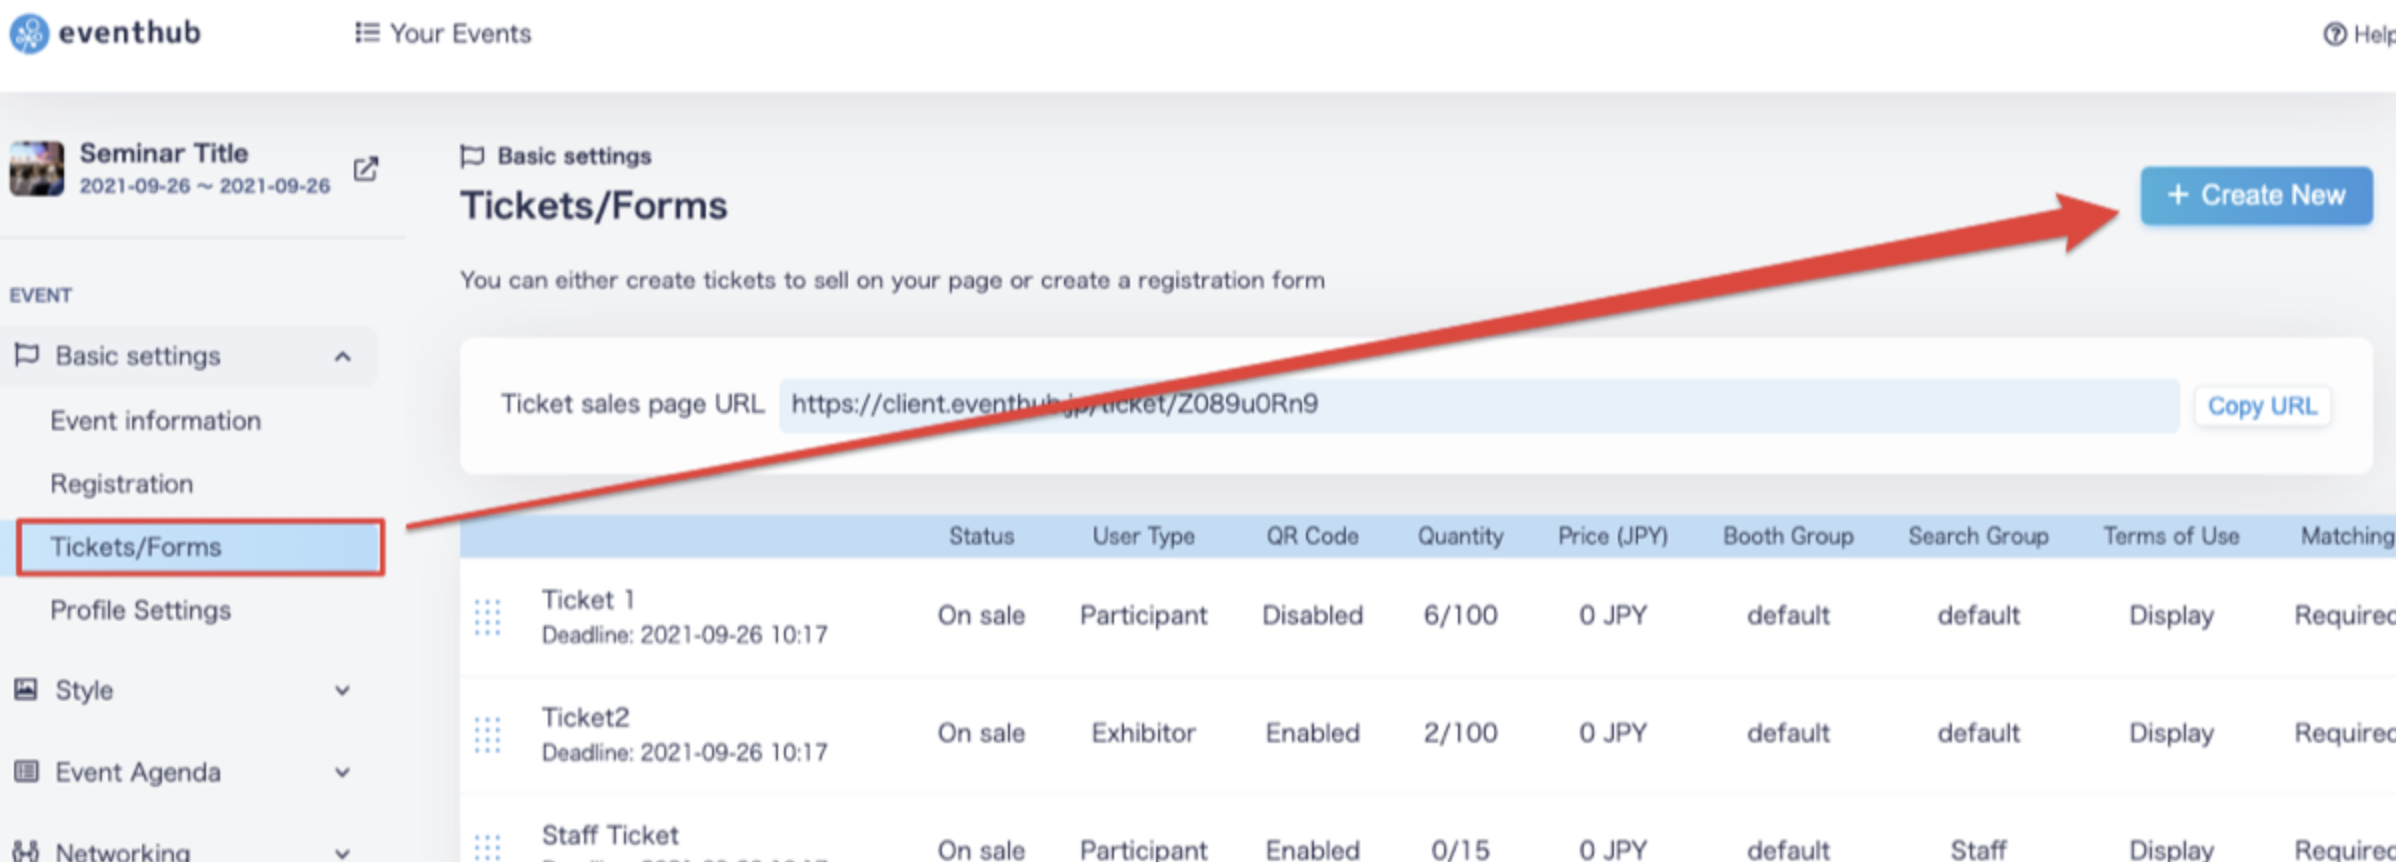
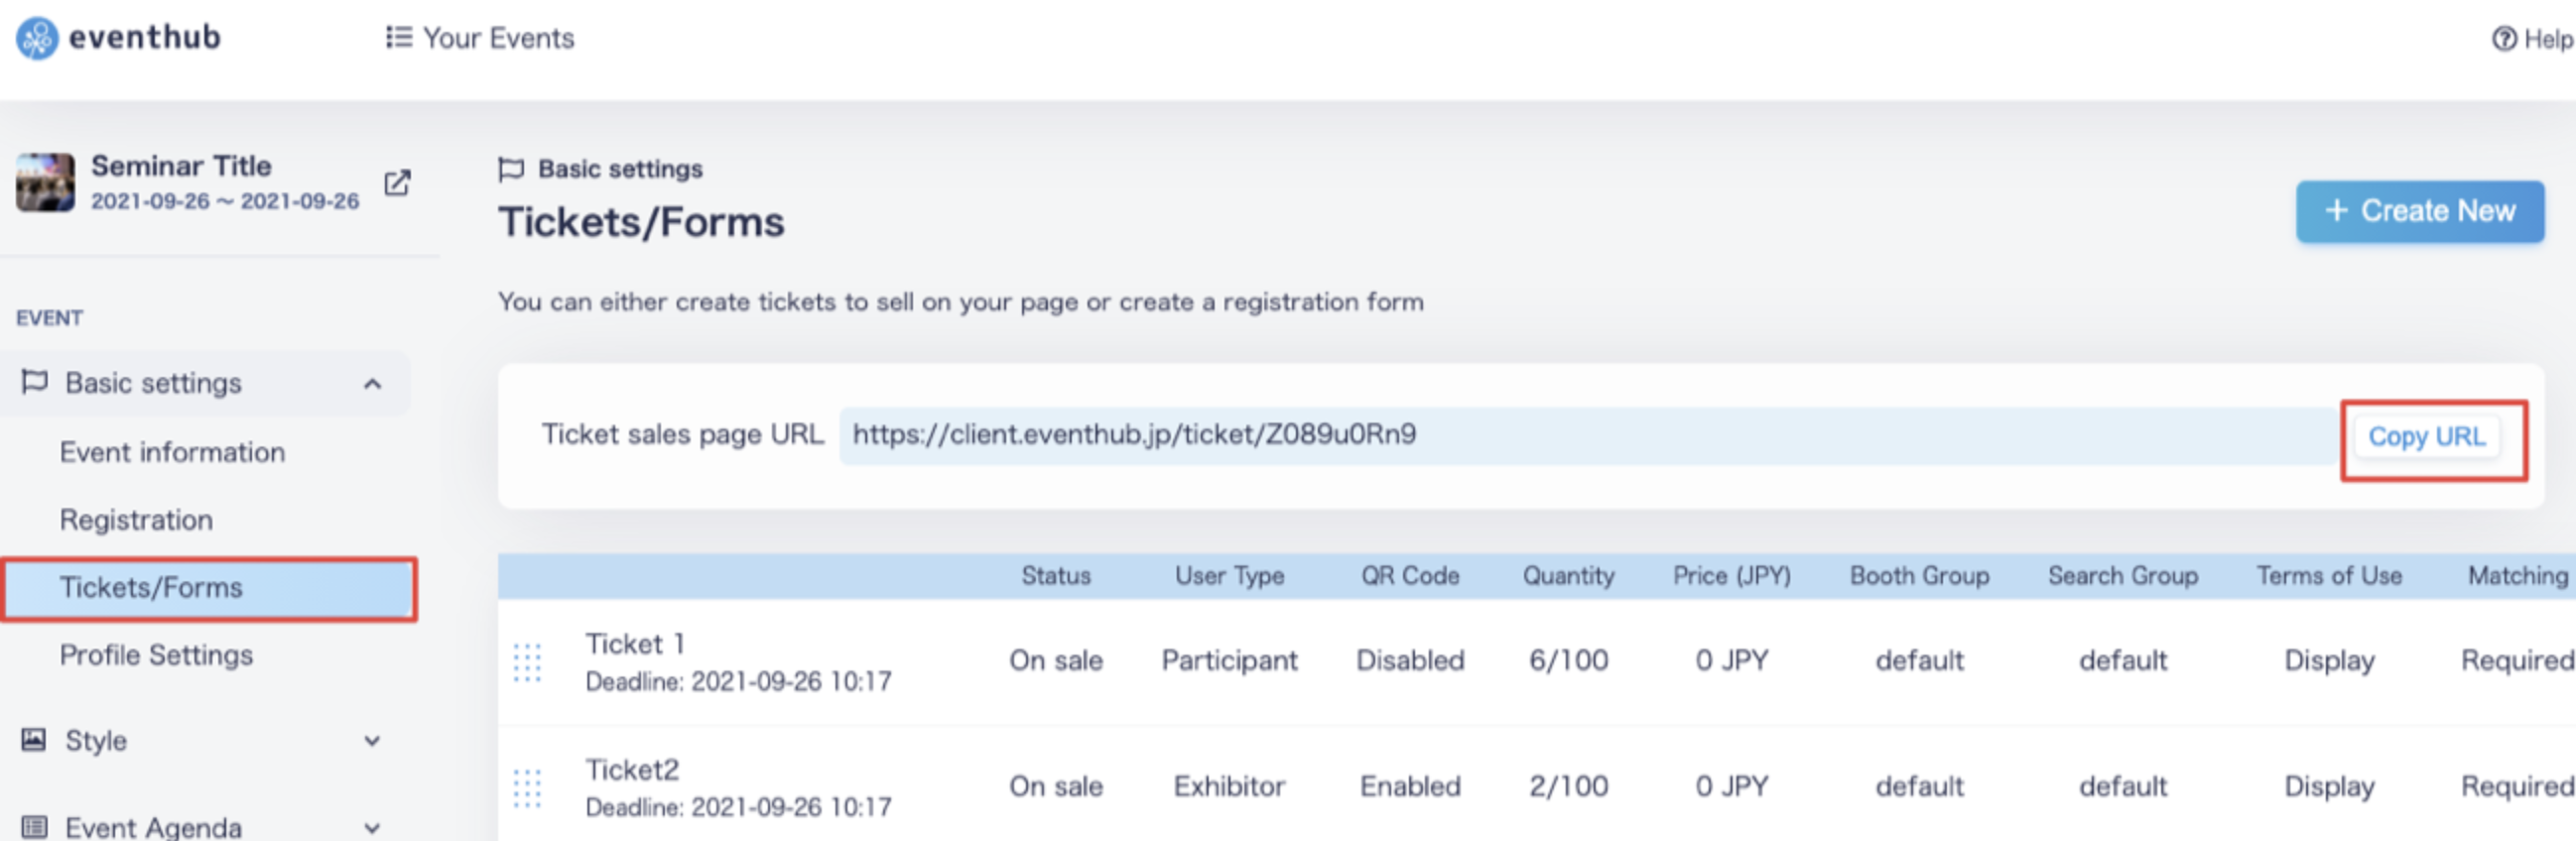
1. Under 'Basic Settings'>'Tickets/Forms', click 'Create New'.
2. Enter the required ticket information and click 'Add'.
<attention>If you would like to group together certain participants to limit/control their networking, please make sure you set up your Search Groups first. Once you have created a registration form, you will not be able to edit search groups. </attention>
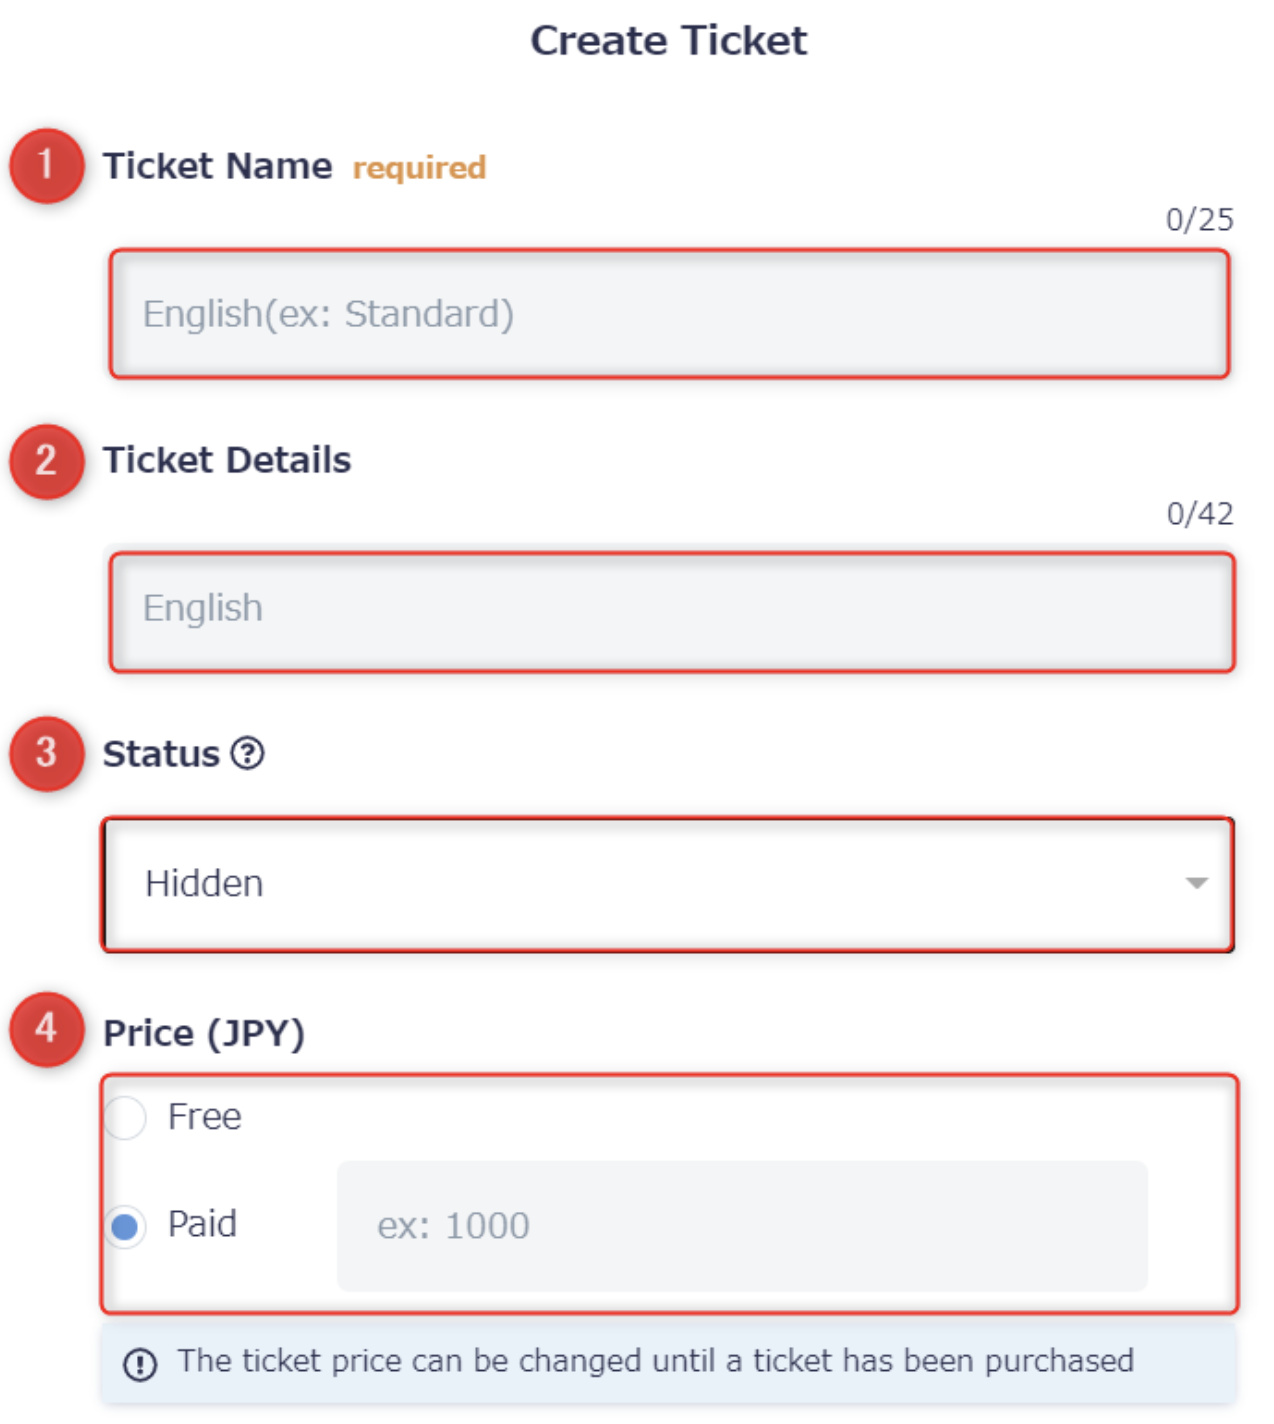
| Itmes | Required/Optional | Details |
| 1. Ticket Name | Required | lease enter the name of the ticket sales page or the ticket type. |
| 2. Ticket Details | Optional | please describe what kind of ticket you are creating. This will be displayed on the ticket sales page. |
| 3. Status | Required |
On Sale: can begin sales/registration right away. Coming Soon: not yet available for sale or registration. Use this option to let participants know in advance a ticket will be on sale. Hidden: if chosen, this ticket will not be displayed on the ticket sales page. Use this option for staff or companies. |
| 4. Price | Required | enter the price of your ticket, tax-included. |
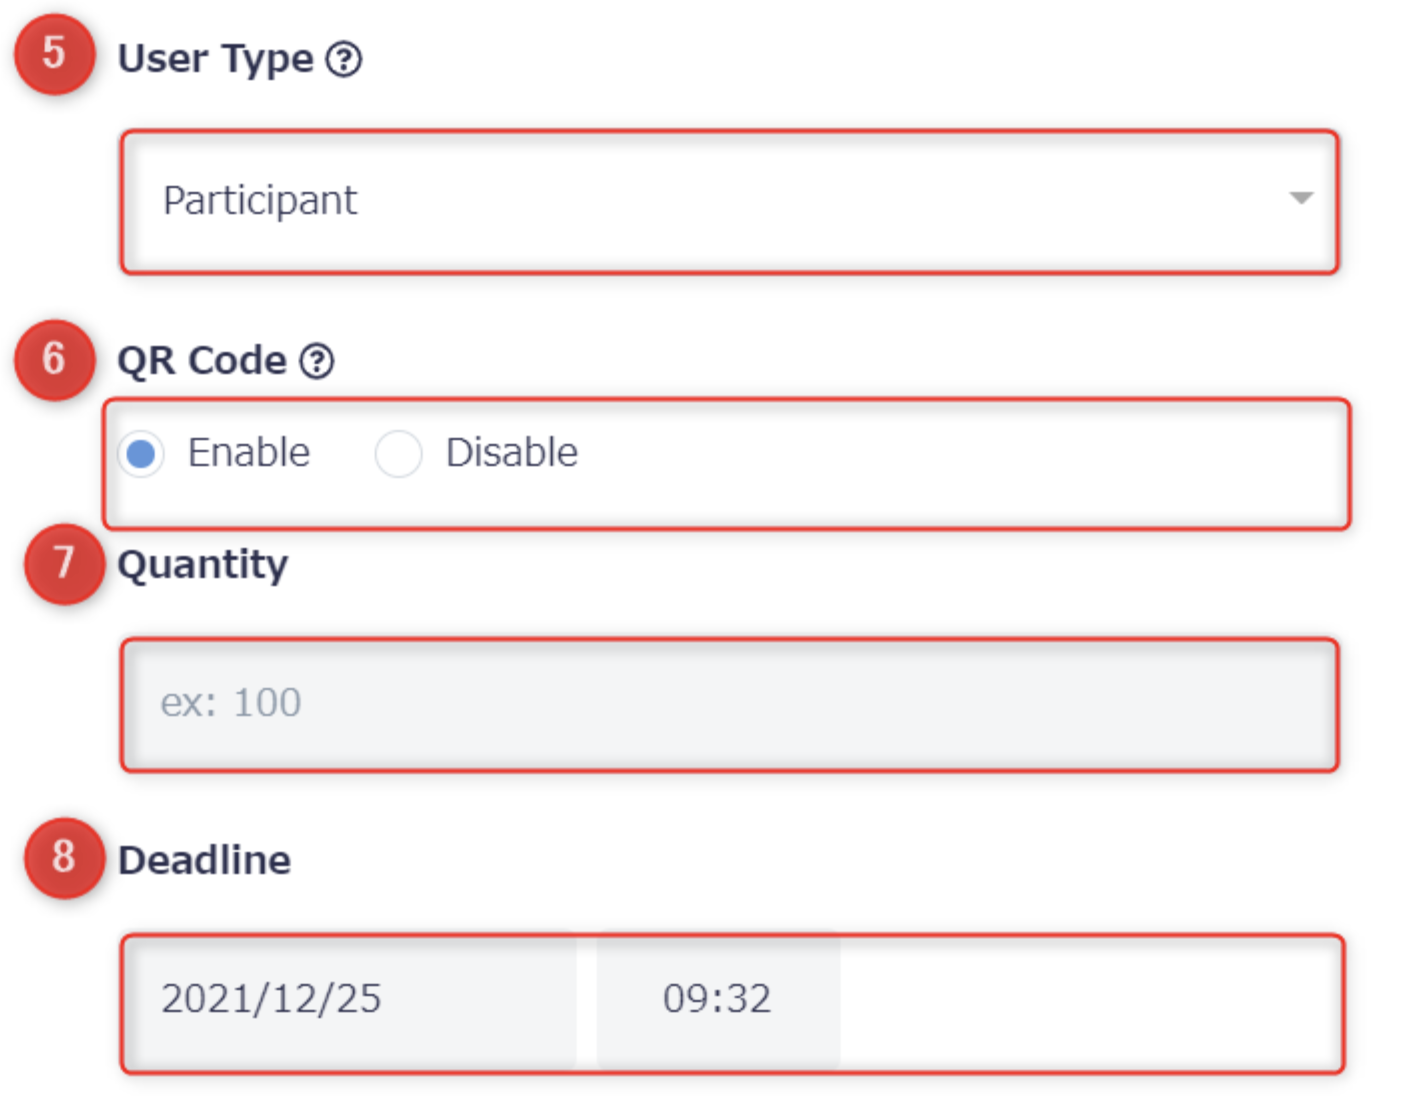
| 5. User Type | Required |
please choose whether this form is intended for participants or exhibitors. Please note: you may currently only choose 'participants' or 'exhibitors' for User Type. |
| 6. QR Code | Required | please choose 'Enable' if you would like users registered with this ticket to be issued a QR code. For online events, please choose 'Disable'. |
| 7. Quantity | Required |
please enter the maximum amount of participants who can register on this ticket. If you don't have a participant limit, please just enter 9999. If someone tries to sign up for a ticket that has already reached its registration limit, a message will appear stating that the ticket has been sold out and they will be unable to purchase it. |
| 8. Deadline | Required | please enter a registration deadline. If there is no specific deadline, please just enter a date after the event start date. |
| Itmes | Required/Optional | Details |
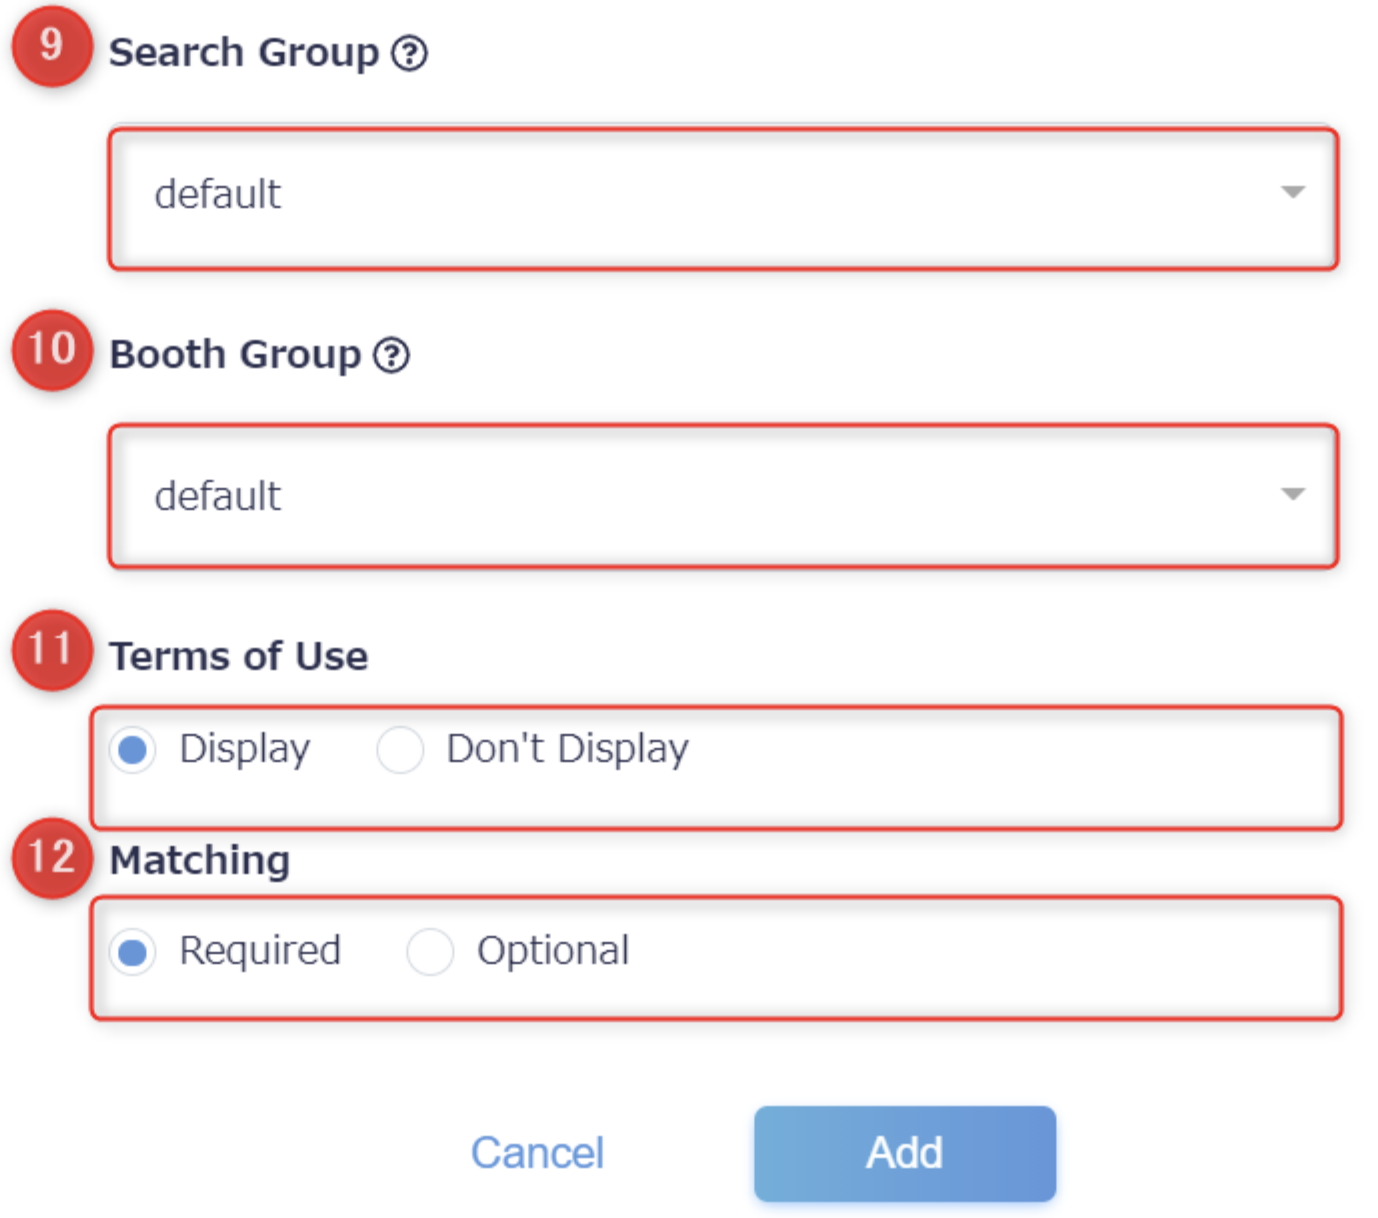
| 9. Search Group | Optional | please choose from the Search Groups that you created under 'Networking'. By setting this, you can chose whose profiles this participant will be able to view and network with after they have registered and logged in. |
| 10. Booth Group | Optional |
just like Search Groups, you can set permissions for which groups can use certain booths. This feature is used for in-person events. |
| 11. Terms of Use |
Optional |
please choose whether you would like your Terms of Use to be displayed at the bottom of the ticket page or not. The terms to be displayed can be filled in from 'Basic Settings' >'Registration'. |
| 12. Matching | Optional |
please choose 'Optional' if you would like participants to have be given the choice to participate in networking (exchanging messages, booking appointments, etc.)on the ticket sales page. Those who wish to network can choose to have their profile displayed to other participants. If you would like for all participants' to be able to network with each other by default and for all profiles to be displayed, please choose 'Required'. In either case, participants will have the option to turn their networking mode on or off from their individual My Page, so even if 'Required' is chosen, participants will be able to opt out at a later date. |
*There is no limit to how many ticket sales pages you can create.
2. Integrate payment platform
You can create a paid ticket by integrating EventHub with the online payment platform Stripe. You will first need to create a Stripe account. Please see Issuing a Stripe Account for more details on how to do this.
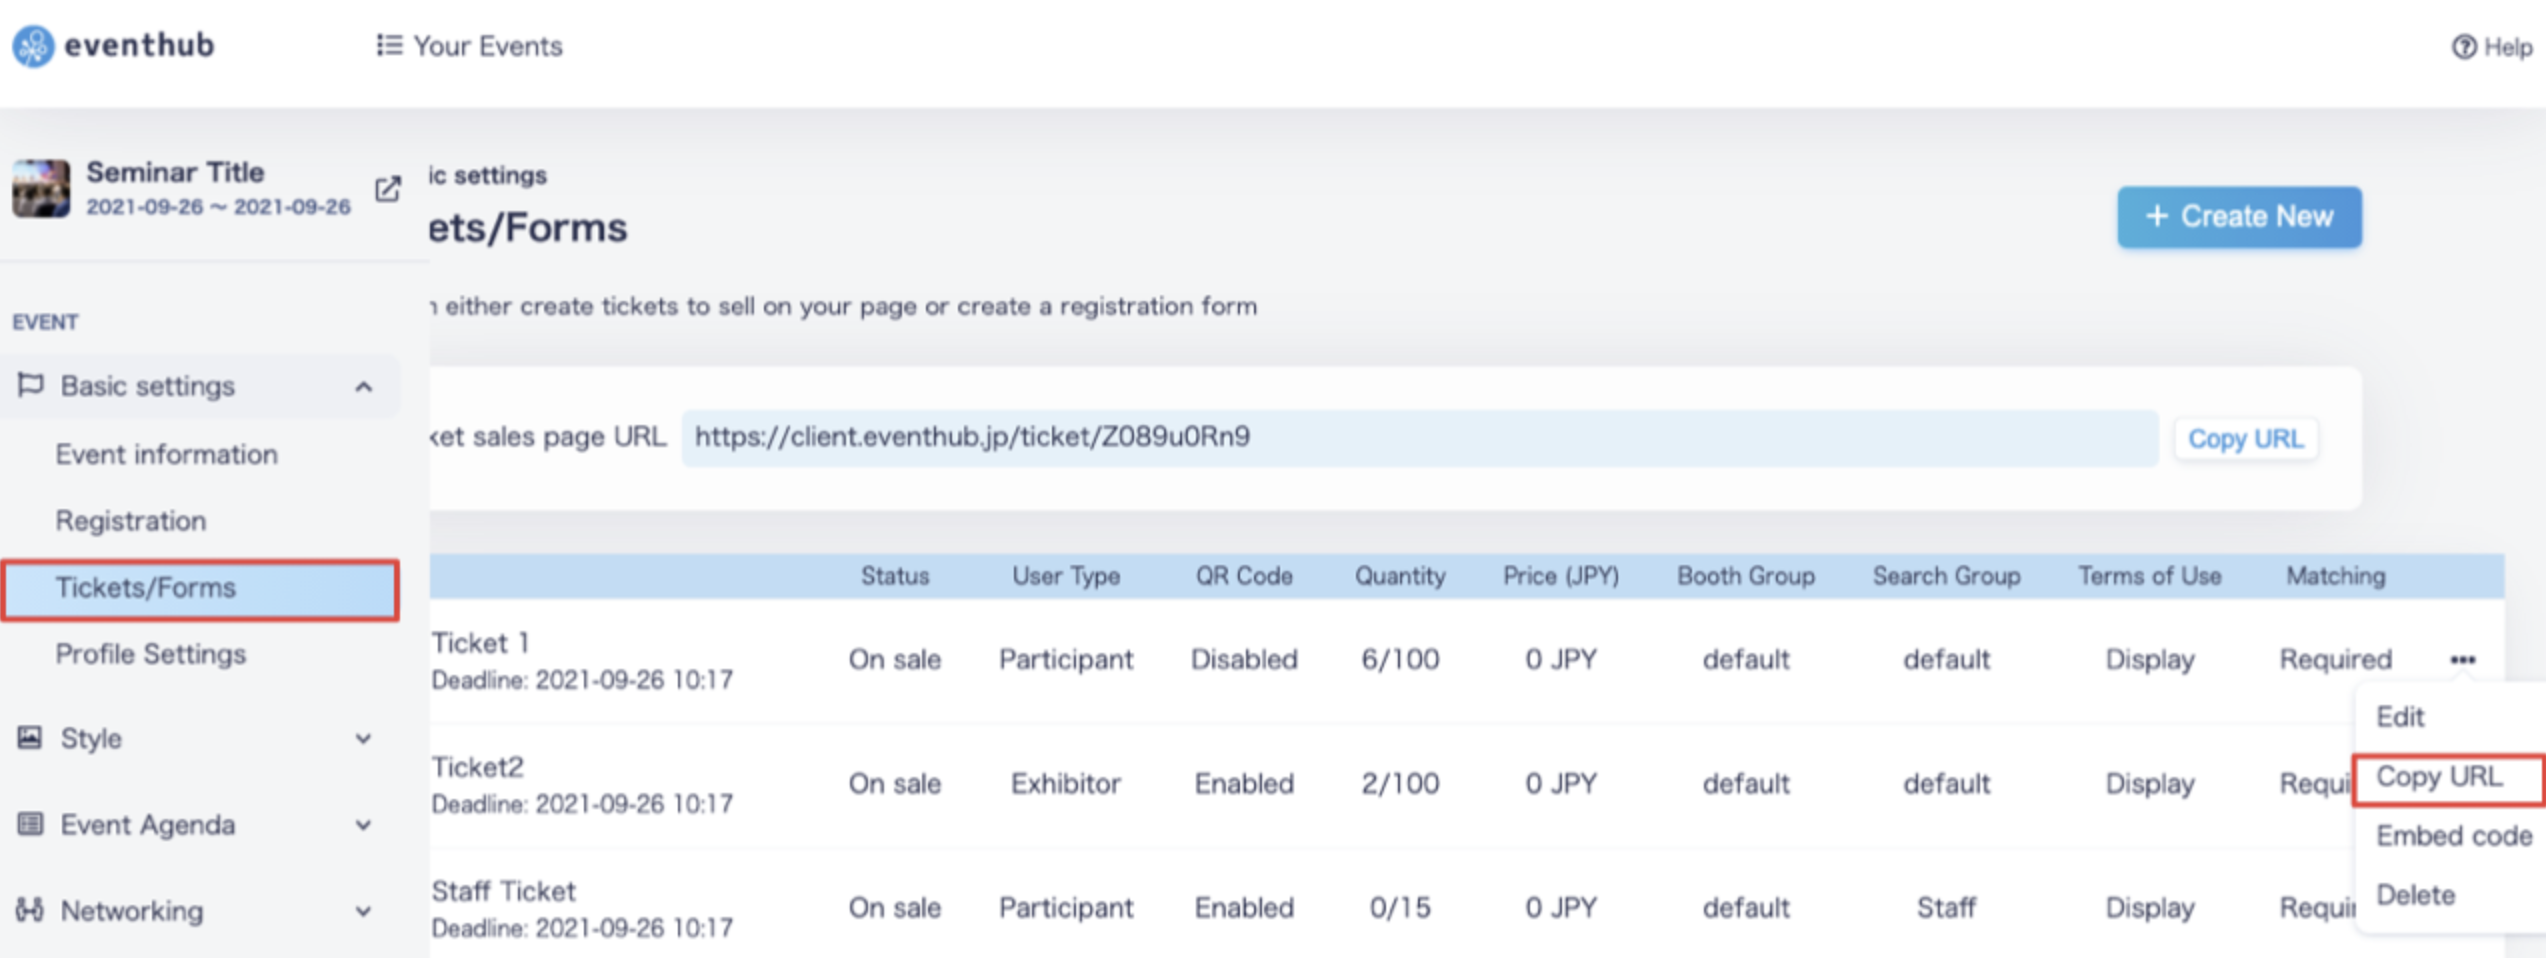
3. Share the URL for your ticket sales page
You can find and copy the URL from the 'Copy URL' button in the top right corner of the screen. Please use this link to direct participants to the sales page. We recommend registering yourself in order to double-check your settings and registration process. You can delete yourself as a user after registering.
<tips>Tickets may be sold prior to the event start date. Participants will be able to access the event page after signing up for a ticket, and will be sent an email with directions on how to log in after registering. For events with scheduled video streaming, participants who have logged into the event page will see a message saying "Coming soon", which will be displayed until the event goes live. Those who have the networking function set to 'ON' will be able to send and receive messages before the event. You can prevent participants from networking prior to the event by setting the start date and time of the networking function. </tips>
4. Share your registration forms
You can copy the URL for your registration forms by clicking on the three dots (・・・)on the far right of the forms you have created, and choosing 'Copy URL'. Just like with tickets, we recommend registering yourself in order to double-check your settings and registration process. You can delete yourself as a user after registering.